Types of lighting fixtures for cars
Cars use 3 types of optics: halogen lamps, LED lights and xenon. Halogen ones work for 500-1000 hours, get very hot and produce a weak luminous flux compared to alternative options. LEDs and xenon are bright and reliable options. LEDs are more expensive, but they provide an intense luminous flux, operate for 30,000-40,000 hours, heat up less, and do not lead to excessive fuel consumption. Xenon is not cheap, operates for 3000-4000 hours, also does not overheat and provides a uniform light fill.
Advantages of xenon
Xenon was the first halogen alternative to hit the market, followed by LEDs in the auto industry. At the initial stage, they did not compete with xenon in terms of glow intensity and other parameters, but thanks to scientific developments, LED optics received characteristics similar to xenon, at a relatively affordable price. LED headlights have taken the lead and become the leader in road use. Despite this, some motorists remain faithful to xenon and bi-xenon headlights.
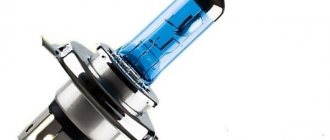
- Xenon produces a bright light output of up to 6000 lumens;
- the level of illumination almost coincides with sunlight, the sun gives a white-blue glow, so visibility with xenon is close to daylight;
- Xenon headlights are used as a tuning element; such car lights are chosen because they cost and look expensive even on an inexpensive car.
Self-installation of xenon on a VAZ 2110
In my article today, I will tell you how to upgrade standard VAZ optics, in other words, how to install xenon on a VAZ 2110 at home. For those who immediately thought about the difficulties associated with performing this work, I will say that there is nothing supernatural in this, you will not need an electrical diploma or some kind of engineering education, it is enough to have a little free time, a little understanding of what xenon is and straight arms, preferably growing from the shoulders.
For those who only know about xenon that it is an expensive light bulb that glows blue - a little history and theory.
The invention of the xenon lamp belongs to the German company Osram, which in the 1940s invented a completely new light source, and already in 1951 introduced it to the world. Xenon gained enormous popularity and was widely used in the cinema and, later, the automotive industry. The xenon lamp retired the less efficient carbon arc lamps, which had served greatly for the benefit of mankind. A characteristic feature of xenon is its bright white, blinding light, which may have a bluish tint. All modern film equipment without exception. as well as modern film projectors are equipped with powerful xenon lamps, from 900 W to 12 kW.
Disadvantages of xenon
Despite the advantages, there are disadvantages due to which car owners often choose LED headlights.
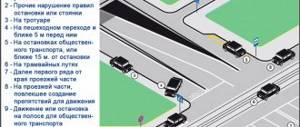
- Not all xenon is permitted by law. The traffic regulations do not directly prohibit such optics, and LED headlights may be illegal if they blind oncoming traffic. Only standard factory xenon is officially allowed. Legislation allows the use of white, yellow and orange, so the blue glow of xenon raises questions among inspectors.
- Complicated installation. The car's standard system cannot withstand the voltage required to ignite and keep the lamp glowing. For this reason, additional ignition units are installed; they are bulky and do not fit into the headlight; the part has to be placed outside.
- Increased fuel consumption. Let’s make a reservation right away that we are talking about an increase of 0.1 liters per 100 km, but this is worth taking into account.
- High price of equipment. Even a homemade version will not be cheap, not to mention high-quality factory headlights . The color of xenon whitens over time, so if one lamp fails, you will have to change both, otherwise the light will differ.
- Mandatory presence of automatic headlight range adjustment.
Installation options
The main condition is that the low and high beam headlights allow you to install xenon lamps or replace standard headlights with bi-xenon ones , for example. Installing xenon in daytime running lights is impossible, because they cannot be made brighter than low beam lights. There are administrative fines for installing gas-discharge lamps in fog lights; read about this in the article: “Is it possible to install xenon in fog lights?”
Xenon installation instructions
The process of installing xenon with your own hands, instead of standard car lighting, is simplified year after year. And if earlier for this it was necessary to significantly change the wiring in the car, use special adapter rings and other devices, today it is enough to make a decision regarding 2 points:
- Lamp type - it can be xenon or bi-xenon;
- Base type - to simplify installation, xenon lamps must be purchased with the same base as the standard halogen lamps installed in the car from the factory.
In some cars, the optics are designed in such a way that the high and low beam bulbs are separated. In this case, installing bi-xenon is impossible - only xenon. In other cases, you can install bi-xenon, and then switching from low to high beam will occur in one lamp.
A xenon kit for installation on a car must include the following components:
- Ignition blocks – 2 pcs.;
- Xenon lamps – 2 pcs.;
- Fasteners (required for installation);
- Set of wires;
- Installation and connection instructions.
It is best to buy a xenon installation kit from a car dealership or a trusted online store. And perhaps it will be a little more expensive than in the car market, but the chance of running into a fake is significantly reduced. However, in any case, the seller must be required to provide a warranty card and all required certificates of quality and conformity.
Typical xenon (bi-xenon) connection diagram
To successfully install xenon with your own hands, it will be enough to follow the instructions that come with each kit. The main thing is to strictly follow the sequence of actions described in the instructions and safety precautions.
Below we provide a step-by-step guide to installing and connecting xenon, compiled by our specialists. For detailed video instructions, see the end of this article.
And so, the sequence of actions performed when installing xenon will be as follows:
- Removing the old lamp . To install xenon lights, you first need to remove the old halogen lamps from the headlights. To do this, remove the plastic protective cap that covers the base on the back of the headlight, and, pressing the metal clip, remove the old light bulb from the socket.
- Installing a xenon lamp . In place of the old one, it is necessary to install a new xenon lamp (previously removed from the transport packaging) into the headlight and secure it with a spring clip.
- Connecting contacts . Observing the correct polarity, connect the power contacts from the old lamp to the terminals from the new one. Carefully insulate the connection points of the wires with electrical tape or heat-shrink tubing.
- Laying wires . As a rule, the protective caps that cover the bulb sockets on the back of the headlight do not have any holes. To lay the wires in each cap, you need to use a construction knife or other convenient tool to cut a neat hole for the rubber O-ring from the wires included in the xenon kit (see the video below). After this, the wires are pulled into the resulting hole, carefully placed in the headlight and closed with a cap. Note : If you did everything correctly, then, as a result of completing the previous steps, you should have a xenon bulb in your headlight, covered with a protective cap, from which two wire harnesses should come out to power the ignition unit and the xenon lamp.
- Xenon connection . In this step, you just need to connect the wires coming out of the headlight to the xenon ignition unit. It is almost impossible to reverse the polarity or insert the plugs into the wrong sockets, since all wires are marked with the appropriate colors, and the sockets have special protection.
- Installation of the ignition unit . The xenon ignition unit is fixed under the hood. However, there are places where its location can cause a lot of trouble. To avoid this, it is not recommended to install the units in areas where water can easily seep in, or near the engine. In addition, the wires should not be too tight.
These operations are performed on both headlights: both the left and the right.
New rules
From January 25, 2020, the traffic police post can check which lamps are installed in the headlights of a car. If a discrepancy is detected, the inspector draws up a protocol on the violation and sends data to identify the driver and determine the punishment. However, the current legislation does not provide for a fine; the violator faces deprivation of rights for 6-12 months. The driver will have to take the test again to get his driver's license back.
If a car owner decides to install xenon lamps in conventional headlights that do not provide the design features necessary for their operation, from the point of view of the law, this is considered an illegal modification to the design of the car, and such a violation may result in the car’s registration being revoked. Another type of sanctions is confiscation of xenon headlights. But to install legal xenon even in a car where it is not provided.
Step-by-step instructions: how to make xenon legal
- Buy original certified equipment for installing xenon: a set of lenses , headlights, auto corrector and washer. Please note that it must pass technical inspection; prepare copies of certificates and other documentary evidence of the authenticity of automotive optics.
- Obtain a positive opinion from an expert in a testing laboratory for the planned changes, indicating that installation is possible and the headlights are working properly. With this conclusion, contact the traffic police, where the changes will be re-checked and another conclusion will be issued.
- Contact a certified service station that is ready to confirm its competence to carry out the work. You can also contact a private workshop or ask for help from a familiar automotive electrician, but then you will have to additionally fill out a paper called: “Application-declaration on the volume and quality of work performed.” This paper will determine whether such work will be accepted or not; for acceptance, you will need to indicate the details and nuances of the work.
- Pass inspection. As part of this procedure, specialists will check how the equipment works and, if necessary, adjust the auto-corrector. After the technical inspection, you will receive a diagnostic card, which will indicate the presence of xenon automotive optics.
- With the package of documents, you need to visit the testing laboratory again, where they will check the changes made and issue another conclusion.
- Go through an inspection at the traffic police and receive a vehicle registration certificate and a title with a note about the installation of xenon.
The procedure is not easy; few car owners decide to go through it and complete the process. It can be easier to change a car to a model with standard xenon headlights than to try to install legal xenon on a VAZ. But in any case, this is a more adequate approach than installing home-made xenon, risking safety and creating emergency situations on the road.
Installing xenon car lights on cars where they are not provided creates a lot of problems for the owner. If the time and financial costs of legalization are commensurate and adequate, it is worth taking care of the paperwork and getting a mark on the PTS and registration certificate. If you are not ready to deal with this process, take a look at alternative options, for example, LED headlights: bright, impact-resistant, last a long time, do not heat up, and do not lead to excessive fuel consumption. Regardless of the chosen option, the main thing is high-quality factory optics. We at Wesem-Light work with large factories and know that the performance characteristics of car lights depend on the manufacturer, packaging and proper transportation. Our catalog includes LED, gas-discharge lamps and bi-xenon headlights. The product is certified and provided with a double guarantee: from the manufacturer and the store, please contact us.
Installation in a standard headlight unit
Preparing the wiring
This can be done by following a certain sequence of actions:
- The first step is to disconnect the negative cable from the battery;
- Prepare the wiring. The plus goes to a yellow wire, the minus goes to a brown wire. Two minuses and the same number of pluses are crimped one by one, after which they must be carefully insulated;
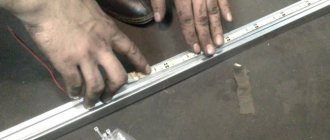
- Process the holes for the lamps with a simple handy tool - a file. Check periodically to see if the bulbs are included. If you overdo it with sharpening, it will be more difficult to return the sawn material to its place;
- Now install bi-xenon optics;
- The wiring from the light bulbs is pulled through the protective cover. You will have to drill a hole first. Therefore, having a drill at hand is a must;
- After installing the headlight in the base, fix it. Just don’t get too clever with polarity;
- Along with the lamp, instructions for connecting the ignition unit are provided. Follow it, there is nothing complicated in this scheme;
- Replace the headlights;
- Connect the negative terminal back to the battery;
- If the headlights function and turn on as expected, then the work can be considered completed early. There remains the last, but very important stage - adjustment.
As you can see, xenon on a VAZ 2110 is quite real. But to avoid any problems with the law, we advise you to spend a little more money and purchase a full-fledged legal module rather than risk driving past every traffic police post.