In the modern world, people strive to indicate their individuality in everything - clothes, jewelry, food, accessories, hobbies. Of course, a car is no longer just a means of transportation, but a reflection of the owner’s personality. It's not surprising that people customize their favorite car. Today there are many tuning options - for every taste and budget.
Neon lighting is an inexpensive, effective way to customize your car.
Neon lighting on a car is one of the very effective, inexpensive and fairly easy to install types of car upgrades. In this article we will look at all the features of installing neon on a car.
So, the neon lighting of the car can be installed both outside (under the bottom, wheel arches, in the engine compartment), and in the trunk, and in the interior. Now, whatever picture your imagination draws, then create it.
Neon lights and the law
Let us immediately make a reservation that Russian legislation has a very ambiguous interpretation of this issue. According to the Appendix to the Traffic Regulations, among the vehicle malfunctions for which its operation is prohibited, clause 3.1 is indicated. “The number, type, color, location and mode of operation of external lighting devices does not meet the design requirements of the vehicle.”
You can get a fine for changing the design of a car without the appropriate documents.
However, GOST R 51709-2001 does not indicate “underbody lighting” or something similar among the types of external lighting devices. You can receive a fine for changing the design of a car without the appropriate documents. Since you are unlikely to be able to obtain permission for such innovations, in this case you are violating Art. 12.5 part 1 of the Administrative Code. As a punishment, a warning or a fine of 500 rubles is possible. and equipment seizure.
ADVICE! Follow two simple rules, and it will be more difficult for traffic police inspectors to issue you tickets:
- Do not direct the light under the bottom to the sides, only down.
- Do not install blue and red lights in the radiator grille and bumper, or white neon in the rear. The red and white colors of the illumination should not extend beyond the front and back of the vehicle, respectively.
Direct the light under the bottom only downwards.
Naturally, it will be much more difficult for the valiant law enforcement officers to find fault with the neon interior lighting.
Allowed or not
If you look at various photos and videos, then objectively the neon or LED lighting located in the underbody area of the car looks gorgeous. These are a variety of color solutions, most noticeable in the dark.
It is important to immediately understand that we are not talking about any practical advantages here. There is no particular benefit from such modifications to the car. But if you dropped something under the car at night, then with the backlight it will be much easier to find this item. Although there is nothing difficult to take a flashlight or turn on the backlight on your phone.
The main reason for installing backlighting is precisely for the visual effect.
But there is also a certain drawback. For some reason, law enforcement officers react very strongly to cars with such tuning and stop the driver at every opportunity. But whether there will be anything to present to the motorist directly depends on how the backlight is implemented.
If you follow all the installation rules, the traffic police officer will not have any grounds for a fine or deprivation of rights.
Basically, the valiant representatives of the traffic police refer to paragraph 3.1 of the current traffic rules relevant in the Russian Federation. It is indicated here that the backlight is a special light signal. This is potentially a threat to a serious fine or even deprivation of rights for a period of 1–1.5 years.
The most important thing here is that the installed lighting does not in any way interfere with other traffic participants. That is, the devices should not dazzle drivers of oncoming cars or interfere with the visibility of those moving behind.
Fans of tuning with experience note that it is better to provide a brightness control in advance to illuminate the underbody. Under normal conditions, the backlight can be turned off completely or adjusted to minimum brightness. Then no one will have any complaints. And already at rallies, shows, and some competitions, you can give out maximum brightness. No one will be fined here.
According to GOST number 8769-75, underbody lighting cannot be classified as external lighting devices of a vehicle.
As for traffic regulations, there are restrictions regarding light sources and their placement on cars. The driver will not face any sanctions if:
- in the front of the car there are lighting devices and reflectors made in yellow, orange or white;
- A backlight for the license plate must be installed at the rear;
- the backlight or reversing lamp must be strictly white;
- rear lights can be red, yellow and orange;
- rear reflectors must be red.
If the backlight is installed on the bottom of the car, the light should be directed strictly downwards.
Installation of such equipment will not be considered a reason for a fine and will be classified as an offense if only the bottom of the car is illuminated, and other external attributes are not affected by the lighting.
In fact, an additional lamp is installed. And it simply illuminates the asphalt under the car.
Types of car lights
So, you have decided to highlight your “swallow” among the mass of similar ones with a bright light frame. This is where the tuning market will provide you with a lot of options. There are only two main types of lighting used in cars: neon and LED.
- Neon lighting is based on lamps filled with an inert gas - neon. Due to its inertness, it is absolutely safe - it does not heat up, does not explode and does not enter into chemical reactions with other substances. These lamps are placed in special tubes that protect them from damage and environmental influences.
Neon tubes come in various colors and sizes.
Neon lamps do not shine directionally, so they always come with diffusers - regular foil or a mirror. Neon tubes are available in various colors and diameters. Also in stores you can find “flexible” neon - thin elastic tubes, which are most often used to illuminate the interior of a car or headlights.
To install an average set of neon lighting on your car, the owner will have to pay an average of a couple of thousand rubles.
The disadvantages include a relatively short period of operation, as well as monochrome. It will not be possible to create shimmers and play of colors with neon lighting. To change the color, you will have to completely change the tubes.
- The second type of lighting is LED. It is a strip of diodes encased in silicone, which performs a protective function. Among the advantages are greater strength and durability, the ability to install multi-color lighting and flashing. Expensive kits include equipment that adjusts colors to sound vibrations. The big disadvantage is the price. LEDs are more expensive than their neon counterpart.
Varieties
Among the types of lighting used today, neon and LED can be distinguished as the most common ones. If neon lighting is made, as a rule, using a gas-discharge lamp, which is placed in a special protective tube and attached to the bottom, then the LED variety is a flexible diode strip, also located in a protective tube. LED lighting is a relatively new type, more convenient and practical, and therefore more expensive.
If we compare the main technical characteristics of the two types of illuminators, it should be said that for normal operation of the neon type of device, a diffuser is required that is responsible for directing the light, while LEDs themselves direct the light and have higher brightness. Both lighting fixtures are housed in high-strength housings that can withstand a fairly severe collision. The underbody lighting kit usually includes two side lamps, two lamps for illumination at the front and rear, as well as all the necessary fasteners.
To control the lighting elements from inside the car, a special unit is used, equipped with programs that can be used to adjust the brightness, change colors, make the backlight flashing, etc.
Thinking through the design
Of course, a car with neon lights looks amazing! And neon interior lighting, when installed correctly, can significantly change the interior of a car. Such lighting looks most advantageous in the dark, as well as on a snowy road in winter.
ADVICE! Think about the color scheme of your lighting in advance. Leading automobile designers, when choosing any type of lighting tuning, recommend choosing it not to match the body, but to contrast it. For example, if you have a blue car, then cherry-colored neon lighting will look much more impressive. Is it difficult to decide on colors? No problem! "Da Vinci's color wheel" can help you.
A car with neon lights looks amazing
Let's start installation
You purchased a brand new neon kit for your car, brought it home and are ready to install. To get started, please read the instructions carefully.
If you decide to install neon lighting for the car interior, then the tape is attached starting from the rear of the car to the trim using superglue or a special adhesive strip included in the kit. Just glue the cord in the right place and connect the batteries to it - car electrics, regular batteries or an inverter for connecting to the cigarette lighter. Connect the wires in the correct sequence: from the + contact of the battery to the place where you plan to install the switch, and connect the negative contact to the body. For a neon cord up to 5 meters long, a 12-volt inverter is sufficient. It can be used to create designs, variations of shapes and colors that are limited only by your imagination.
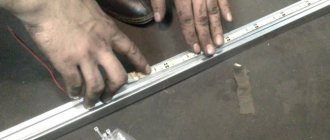
If, for example, the bottom of a car is chosen as the location for installing the neon, then first you need to mark the fastening. And then:
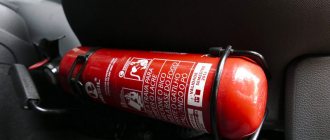
- Don't forget to buy the necessary tools, silicone for insulation, fastenings (staples, screws, clamps), wires and a transformer.
- Install the tubes according to the intended pattern.
- Now feel free to tackle the electrics. The wire connection is serial. Observe polarity.
- The transformer is secured under the hood with screws. We connect to the battery with high-voltage wires. Then we pull the switch from minus into the interior. All that remains is to connect the wires from the tubes to the high-voltage unit.
Ready! Your car has been completely transformed. Now get ready for the admiring glances of passers-by and other motorists. Good luck on the roads.
Illumination of the underbody of a car can turn an ordinary car into a brutal car that is impossible not to pay attention to. Modern craftsmen from tuning studios offer a choice of several types of illumination for the underbody of the car, it all depends only on the desire and financial capabilities of the client.
The capabilities of modern electronics make it possible to perform backlighting:
- flashing;
- multi-colored;
- flashing to a point;
- changing light shades.
If desired, you can not only illuminate the underbody of the car, but also illuminate such elements as:
- wheel arches;
- trunk;
- radiator;
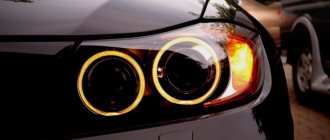
- headlights and taillights.
Given the ability to illuminate almost any element of the car, there is no need to turn the car into a New Year tree or a light monster. Correctly executed car illumination causes admiration, but oversaturation with light irritates others.
When installing lighting equipment, you should comply with the requirements of regulatory documents; you should especially pay attention to this when installing the lighting yourself. In workshops, technicians usually follow these rules and draw the customer's attention to this during installation.
Types of underbody lighting
Before illuminating the underbody of the car, you should familiarize yourself with the proposals in this sector. Modern lighting is divided into:
- LED;
- and neon.
Both types of light illumination have both their advantages and disadvantages.
LED backlight is a shock-resistant, usually plastic tube with an LED strip placed in it (photo below).
LED strip has become widespread, allowing you to cut pieces of the desired size in the designated places. The main advantage of this type of lighting is the simplicity and reliability of the design, attractiveness of prices when purchasing equipment and installing the product.
The disadvantages of this type of body lighting include the fact that the bright multi-colored light cannot be focused and made into spot lighting.
LED lights
Neon lighting is several gas-discharge lamps located in a shock-resistant housing (photo below).
Neon lighting allows you to focus and direct light to the right place, creating a spot lighting effect. But this is where the advantages of this type of vehicle underbody lighting end. Fragile neon emitters very often fail and require additional money.
Neon lighting, compared to LED lighting, loses in brightness and variety of glow.
Neon lights
The complexity of installation, and therefore the cost of this work, is an order of magnitude higher than that of LED devices.
Control block. In order to be able to use various light combinations on the installed equipment to illuminate the underbody of a car, you will need a backlight control unit. Without this element, the car’s lighting will turn out to be simple, with uniform illumination. When choosing a control unit, you should pay attention to two points:
- number of programs offered;
- remote control of installed equipment.
The more programs offered by the manufacturer, the more possibilities there are in implementing backlighting. Remote control of lighting equipment will allow you to get rid of unnecessary holes in the body and other elements of the car.
How to install backlighting on a car
Car illumination can be done in two ways - contact a specialized workshop or do it yourself. With the installation of lighting in the workshop, everything is simple, the main thing is to find a decent one, as well as the availability of money and time.
If you like to experiment with your car and create something with your own hands, then installing undercar lighting is the job for you. The advantage of self-installation is not even the factor of saved money, but the opportunity to experiment with the choice of lighting. If you don’t like the result of the work, you can try a different lighting solution.
To install LED underbody lighting yourself, you will need:
- colored LED strip with moisture protection and good brightness;
- cable with 4 small cross-section cores;
- heat-shrinkable sleeves suitable for the cross-section of the cores;
- U-shaped aluminum profile into which the LED strip is inserted;
- system control unit.
When installing, you should pay attention to several nuances:
- It is better to mount the system control unit in the engine compartment, closer to the fuse box.
- To obtain even light, when placing the LED strip, it should be placed symmetrically, at an equal distance from the elements of the car.
- Attach the system elements so that they do not hang down anywhere and do not rub against the elements of the car.
Video: instructions for installing underbody lighting.
It is better to entrust the installation of neon lighting to professionals, but you can try to do the simplest one or two emitters yourself. Neon lighting is rarely flashing, since gas-discharge lamps have a very long start-up time, and frequent switching significantly reduces their service life.
Nuances of operation
Many motorists are interested in the question of whether illumination of the underbody of a car is prohibited, and what kind of violation is provided for this.
In a number of regions, traffic police officers have a negative attitude towards illumination of the underbody of the car. Most inspectors believe that the installation of light illumination falls under Article 12.4 of the Code of Administrative Offenses, Part 1, which provides for a fine for illumination of the underbody of a car for individuals of up to 3,000 rubles with confiscation of the specified devices and accessories.
However, in accordance with Article 12.5 of the Code of Administrative Offenses, Part 3, for driving a car with incorrectly installed lights, you can lose the right to drive a car for a period of six months to one year.
Due to severe penalties, it is better to use car lighting in areas specially designated for auto shows.
Cost of equipment and installation
As has already been said, the price of the equipment will depend on your desire and ability to afford the money, the minimum set will cost the buyer 1,500 rubles, the set will include an LED strip, a control unit, control buttons and in some cases a remote control.
If we talk about expensive lights and better ones, then their cost will cost 7,500 rubles. The set will contain not just an LED strip, but a special long capsule inside which contains an LED strip, protected from moisture, dirt and other damage. The kit will also contain all the necessary wires, a high-quality control unit and a remote control.
It will all depend on your car, how big it is or how well you want the lighting to be done. As for the installation work, in case you are afraid to install it yourself, it will cost you from 2000 rubles, since the process is labor-intensive and cannot be completed in 30 minutes.
Introduction
Illuminating the underbody of a car is an original way to make your vehicle stand out from the crowd. Few people decide to undertake such a radical modernization, because you will have to pay at least $100 to create original underbody lighting at any service center. In fact, almost any car owner can make the lighting themselves. In order for the car to take on a spectacular look, you will need a couple of hours of free time and budget materials that can be purchased at any auto parts store. Despite the fact that home-made lighting excludes remote control of LEDs or neon lamps using a remote control, improving the bottom will give the car a pleasant exterior.
Stylish underbody lighting makes the car stand out in traffic
How to choose a neon cord
Today, cold neon is available in several forms:
To get the brightest light, you should give preference to 3rd generation cords. CWS products are a little more convenient to use, since in this case the cord is equipped with a cable, thanks to which the backlight is much more securely fixed between the plastic elements of the car interior.
It is also worth paying attention to the cross-section of the product. Typically, the diameter of a neon cord can range from 0.9 to 5 mm. Many people believe that the thicker the product, the more light it will give. In fact, the opposite is true, since in this case the PVC coating is thicker, and accordingly the light will be more subdued. In addition, a thicker cable bends less easily and is more often used in places with the greatest vibrations and loads (for example, on the bottom of a car).
To determine the cross-sectional diameter of the cord, the easiest way is to first measure the gap into which the flexible neon will be installed. If the luminous tape does not “sit” firmly, then due to the slightest vibrations the product will fall out and sag, ruining the aesthetic appearance of the interior.
Also today on sale you can find a ready-made backlight kit that connects to the cigarette lighter. However, this method of using neon is very inconvenient. Firstly, the splitter that is installed in the connector is too large and will visually disturb the ambience of the cabin. Secondly, there are always many other uses for the cigarette lighter, so it is not rational to occupy it with lighting elements.
Therefore, it is much more convenient to purchase the required amount of flexible neon (costs about 120 rubles per meter) and “power” it on your own.
Choosing the optimal underbody lighting
Car owners who have doubts about whether it is possible to install illumination on the bottom of the car can carry out this type of tuning procedure with their own hands without a twinge of conscience. From the assortment on the market, you can purchase flashing, multi-colored, periodically changing shade and point-flashing lighting.
The underbody lighting can be LED or neon. LED underbody lighting will require the car owner to purchase a special shock-resistant tube and an LED strip directly. On the market you can find a tape that, when cut to fit the parameters of the machine, functions without compromising the performance of the entire lighting fixture. This type of lighting is easy to install and reliable in operation.
Neon underbody lighting is a type of lighting that requires the purchase of gas-discharge lamps and special shockproof housings. Neon lighting allows you to focus light on one point.
Illumination using LED strip
Our technical center carries out various types of work on installing LED strips.
| Installation location | Installation time | Single color tape installation cost | Cost of installing an RGB strip with a controller |
| Floor | from 2 hours | from 900 rub. | from 1,350 rub. |
| Trunk | from 1 hour | from 1,500 rub. | from 2,250 rub. |
| Bottom | from 6 hours | from 7,500 rub. | from 11,250 rub. |
The tape will be installed in a hidden way, that is, only the light emitted by it will be visible. After installation it will last for a long time. When installing an RGB strip with a controller, you can accurately select the desired glow color that will match the body color or ideally match the interior.
List of required equipment
Before thinking about how to illuminate the underbody of a car, the vehicle owner must take into account several important criteria. First, it is necessary to resolve issues regarding the comfort and quality of such manipulation; at the same time, you need to prepare the car and think about the result of the modernization.
In order for the underbody lighting to look aesthetically pleasing, it is necessary to evenly distribute the light source. Not all car models have the ability to attach lighting strips or lamps without the use of additional equipment. Most likely, the car owner will need to buy a device in the form of a cable attached to the bottom; such a simple device will help securely secure the entire lighting system.
To create illumination for the underbody of a car, you need to choose the right equipment; for low-slung cars, you should purchase a less powerful device; for high-slung cars, on the contrary, a brighter one that can highlight the beauty of the vehicle.
How to install neon on your car
In the modern world, people strive to indicate their individuality in everything - clothes, jewelry, food, accessories, hobbies. Of course, a car is no longer just a means of transportation, but a reflection of the owner’s personality. It's not surprising that people customize their favorite car. Today there are many tuning options - for every taste and budget.
Neon lighting is an inexpensive, effective way to customize your car.
Neon lighting on a car is one of the very effective, inexpensive and fairly easy to install types of car upgrades. In this article we will look at all the features of installing neon on a car.
So, the neon lighting of the car can be installed both outside (under the bottom, wheel arches, in the engine compartment), and in the trunk, and in the interior. Now, whatever picture your imagination draws, then create it.
Step-by-step instructions for creating underbody lighting
Neon lights
Do-it-yourself underbody illumination must be achieved through the correct placement of lighting equipment. Neon underbody lighting installed on a car requires a reasonable approach; the car owner needs to place the lamps outside the line of sight. Neon lighting looks much more attractive if the main effect is conveyed by illuminating the asphalt under the car. Direct light from a neon lamp negatively affects the exterior of the car.
Neon illumination of the bottom will require the creator to have knowledge in the field of electrical installation. Sequencing:
- the purchased neon lighting kit should be thoroughly studied;
- work must be carried out with the battery turned off;
- select the installation location of the kit (it is advisable to exclude places where there is a huge number of wires, fuel supply and elements related to the brake system);
- make sure the site where installation work will be carried out is safe;
- check the integrity and functionality of neon pipes;
- you need to decide in advance on the places for attaching the brackets, which are most often provided in the finished kit;
- in those places where the staples will be located, there must be a thorough surface treatment with silicone sealant (this will prevent the negative appearance of rust);
- the screws must be firmly driven into the holes created, while the wires from the tubes should be located in the rear of the car;
- A converter should be located next to the battery, which is subsequently connected to the common lighting circuit.
The cutting of pipes specified in the instructions must be carried out using a heat gun, which helps create a seal on the heat-shrinkable tube. The power wire must be directed towards the positive side of the power unit. The resulting step is to connect the switch to the fuse under the motor.
LED lights
The easiest way to do it yourself is to use LED underbody lighting. To create a lighting system with your own hands, you need to stock up on:
- LED strips (color depends on the taste of the owner);
- plexiglass;
- small diameter plastic tubes;
- thin two-core copper wire;
- resistor.
Illumination of the bottom must begin with the creation of a special housing. In this matter it will not be possible to do without a plastic pipe. First you need to cut the pipe lengthwise into two equal halves, which will result in half-cylinders. Covering the inside of the housing with foil helps improve the light quality of the entire system. A drill should be used to make many holes.
After the housing is ready, you need to start working on the LEDs. It is extremely important for the motorist to carefully file and polish the ends of the product, which will contribute to the soft and organic dispersion of light. The pre-prepared resistor and LEDs should be placed in one of the halves of the sawn pipe. Before you begin mounting, you need to make sure that all LEDs are functioning. Half of the pipe filled with diodes and a resistor must be additionally equipped with plexiglass so that as a result the owner of the vehicle gets a half-transparent half-cylinder. The plexiglass is secured using galvanized sheet metal; small cracks and holes must be hermetically sealed with a layer of silicone. The power source for the entire structure is a common circuit with a fuse and a shutdown switch located on the panel.
Installation procedure
It is quite possible to handle the installation of lighting on the underbody of a car with your own hands.
The main thing here is to follow the instructions and observe basic safety precautions.
Before you make your own lighting for the underbody of your car, you need to take into account the following recommendations:
- for work it is better to use an inspection hole or a lift;
- high-quality and bright lighting is required;
- gloves and goggles are used for protection during work;
- It would be a good idea to pre-rinse the bottom and dry it;
- improve skills in working with electronics and electrical equipment if there are problems with this.
Now you can get to work.
The step-by-step process of installing the backlight can be divided into the following steps:
- First, you need to assemble the circuit without installation, making sure it works. If, upon completion of installation, it turns out that the backlight is not functioning, you will have to remove it and look for the cause of the problem. Therefore, a preliminary check will save you from a number of problems in the future.
- One of two connection options is selected - serial or parallel. When connected in series, the entire bottom is illuminated. You will need to connect 2 wires to the power source. That's all. In the case of a parallel connection, you can put together several sections that highlight the bottom of the car. They are connected in parallel, and a common additional wire is supplied to the power source.
- It is extremely important that when using single-sided power supply, the length of the LED strip is no more than 5 meters.
- If pieces of tape are used, it must be cut strictly along the line specified by the manufacturer. The required number of elements is cut out. The length is selected taking into account preliminary calculations, plus you need to leave a margin of 20 cm.
- You also need to prepare the wires that will connect different sections. In the places where they are connected, the tape must be tinned. By observing the polarity, the union is performed.
- The prepared layout is connected to a power source. The soldering area is insulated using heat-shrinkable tubing. In this case, experienced specialists do not recommend using ready-made connectors. Otherwise, there is a risk that with constant vibrations of the machine, the system will at some point stop working.
- To secure the tape to the profile, you can use nylon ties. But tape and adhesive tapes will not work. Over time they will probably disappear. A distance of about 10 cm is maintained between the ties.
- The profile for fastening is cut into pieces, leaving a margin of about 3–5 cm in length. This length is needed to ensure a tight connection at the soldering points. Otherwise the circuit may become loose.
- You need to make sure that the tape does not sag anywhere and is not stretched too much. Otherwise, a break is inevitable.
- You should select in advance a place to place the control unit and RGB controller (LED controller). This will be a seat in the cabin. Subject to the principles of comfort and safety, the backlight is connected to a power source.
- It is important not to forget about the fuse. It is mounted in the gap of the positive wire. Moreover, the location is chosen so that, if necessary, it is easy to get to it, check and replace it.
- The stabilization scheme is optional, but desirable. This will allow the backlight not to burn out due to possible overloads of the RGB LED strip.
Upon completion of work, final testing is required. If all is well, you can hit the road and demonstrate the result of your own labor.
Neon is power, brightness and strength
Let's try to understand what neon variation is and how it differs from other types of lighting design. If we recall the famous Hollywood film “The Fast and the Furious,” then neon was used in its shots on cars. A gas-discharge lamp is used as a luminous element of the neon illumination system. It is placed in a special tube that protects the backlighting device from damage and various external influences, including moisture, dust, dirt and much more.
Thus, the neon component can give an unusual and incredibly bright glow. As for the diffuser, for neon options it is customary to use regular foil or a mirror, which do this job perfectly. Why is foil or a mirror used instead of a diffuser? Everything is very simple. This need arises due to the fact that a neon lamp shines in all directions, and most of it (if a diffuser is not used) will go nowhere.
Neon is usually used to illuminate the underside of a car. Neon electric illumination of the bottom can turn a car rushing along the road at night into something incredible and fabulous. Such a car can be compared to a bright, high-speed meteor.
In addition to neon, LEDs can also be used to illuminate the bottom. They will be discussed in detail below. Now I would just like to note that LEDs have their advantages and, compared to neon, they have strengths. In particular, this concerns the high strength and service life of LED structures.
Neon components have their advantages and disadvantages. We will return to the advantages later, but the disadvantage of such lamps concerns not only the mandatory installation of a diffuser, but also the inability to shine in different colors. In other words, for neon lighting, only one single color is selected, which becomes the main one. But it can be changed and it shines with attractive power.